Unity Optimization: Speeding up FOVMapping bake time by 14x with Unity Burst Jobs and RaycastCommand
Tue, Oct 21, 2025
By Michael (Mwalk10)
Read in 25 minutes
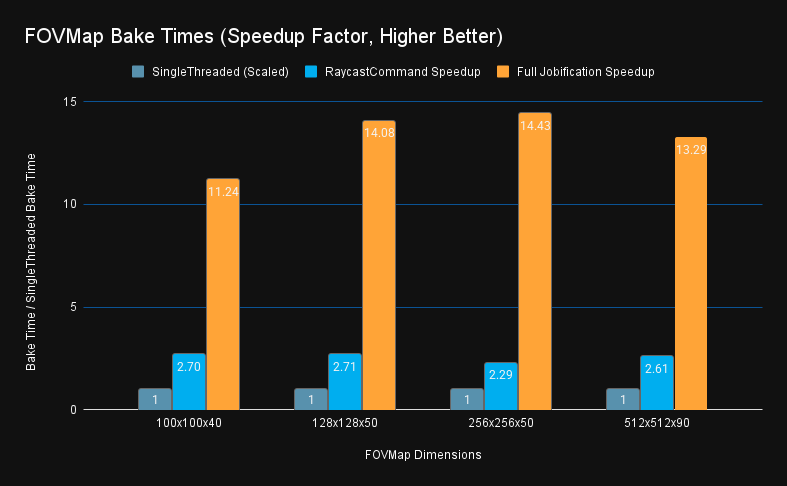
Table of Contents
The FOVMapping Library
I had been putting off adding fog of war to Salvage Wars for a while. I wasn’t satisfied with setting up a separate camera render system where the sight lines were always perfectly circular. Spotting is a key attribute of units in the game, and I wanted to give players a better preview into occlusions that prevent spotting. After searching the Unity store, I found the FOV Mapping asset that not only does what I want with optimized rendering, but was also free. After further searching the internet, I was not able to find resources regarding creating a detailed and scalable fog of war like this. Even other paid assets take a raycast or shadow casting approach that works perfectly with a single player character, but is not suited for handling the entire RTS game map.
What is FOV Mapping? Via the store page description:
FOV Mapping by StupaSoft is an advanced approach to Field of View (FOV) and Fog of War (FOW) systems for Unity. Leveraging the power of the GPU, it stands out as a high-performance solution that offers exceptionally efficient field of view system. FOV mapping has the following strengths.
- High Performance - Running on the GPU, FOV mapping does not enforce the CPU to check the visibility of each pixel, nor does it fire numerous rays toward all directions. You can increase the number of units as you want without sacrificing the performance. FOV mapping can handle sights of hundreds of units at once.
- Terrain-Adaptiveness - FOV Mapping can deal with terrains with highly variative elevation. With FOV mapping, you will find the fog of war harmonizes with your own terrain in a seamless manner.
- Rich Features - FOV Mapping provides various functionality to make your intention feasible. You can fine-tune the property values to adjust the visibility of enemy, sight range, and even precision of the FOV maps. Moreover, FOV Mapping not only supports the Unity built-in render pipeline, but also the Universal Render Pipeline (URP), which is widely used across the gaming industry nowadays.
https://assetstore.unity.com/packages/tools/particles-effects/fog-of-war-field-of-view-269976
StupaSoft’s Changhwi Park wrote about the implementation of this project in detail in a three part blog post here:
- Part 1: https://objectorientedlife.github.io/personalprojects/FOVMapping1/
- Part 2: https://objectorientedlife.github.io/personalprojects/FOVMapping2/
- Part 3: https://objectorientedlife.github.io/personalprojects/FOVMapping3/
He was also gracious enough to release the source code for this project under the MIT license, allowing me to extend it: https://github.com/StupaSoft/FOVMapping
FOV Map Baking Algorithm
A FOV map is a 2d grid on the XZ plane where each grid cell has an float array of directions. (for a total of 3 dimensions widthxheightxdepth) In each direction, we cache the closest FOV blocking obstacle in that direction as a float 0-1 relative to the maximum sight distance for that map. This map is then stored into a Texture2DArray, and a shader is used at runtime to quickly calculate total visibility given view cones and unit locations.
The FOV map generation process consists of three distinct stages:
STAGE 1: GROUND HEIGHT DETECTION
- Raycast downward from maximum height (5000 units) at each grid cell center to find the ground height
- This generates one raycast per grid cell (
FOVMapWidth×FOVMapHeighttotal rays) - Cells without ground are filled with white (maximum visibility)
- Calculate the “eye position” by adding
eyeHeightto the ground level for subsequent steps
STAGE 2: OBSTACLE DETECTION PER DIRECTION
- For each valid grid cell, sample multiple directions (4 channels ×
layerCountdirections) - For each direction, cast multiple rays at different vertical angles (
samplesPerDirectionrays) between-samplingAngle/2to+samplingAngle/2 - Track the maximum sight distance achieved before hitting terrain obstacles
STAGE 3: BINARY SEARCH EDGE REFINEMENT
- When a vertical ray transitions from “hit obstacle” to “no hit”, perform binary search along the vertical angle dimension
- Find the precise vertical angle where terrain visibility ends (e.g., top of a wall)
- Uses
binarySearchCountiterations to narrow down the exact angle - Early termination if surface is nearly vertical (
blockingSurfaceAngleThreshold)
Optimization Results
Before getting into the details of how I did it, let’s skip straight to the results. The full optimization pass resulted in a 14x speed improvement from the single threaded version. Solely converting from in-line raycasts to batched RaycastCommand was responsible for a 2.5x speed improvement, while further wrapping the generation and consumption of those commands in burst-compiled parallel jobs was responsible for a further 5.5x improvement.
Surprisingly, raycasting was not the bottleneck; instead, trigonometry functions and other operations were the primary culprits. The key aspect of the bake process allowing this parallelization was the inherent independence of each (cell, direction) pair’s logic, making this process “trivially parallelizable” without synchronization, and thus “easily” convertible to job code.
For performance analysis, see the chart below of the speedup and profiler results taken on various map sizes: tiny (100x100x40), small (128x128x50), medium (256x256x50), and large (512x512x90). The bake times for both the single-threaded raycast command only and the full job system versions are available for comparison.
Bake time data in seconds:
| Dimension | Single Threaded | RaycastCommand | Full Jobification |
|---|---|---|---|
| 100x100x40 | 36.88 | 13.65 | 3.28 |
| 128x128x50 | 74.92 | 27.68 | 5.32 |
| 256x256x50 | 307.13 | 134 | 21.29 |
| 512x512x90 | 2100 | 806 | 158 |
As you can see, this 11-14x speedup factor is consistent across the small and large bake sizes. This is running on my system which is a i9-9900K, 8 cores at 3.6 GHZ, and 64 GB of system ram. Because my CPU has eight cores, I was directionally expecting an 8x speedup, and was surprised to see other efficiencies (likely burst compilation) brought that up beyond 8x. Other systems may see less of a speed up with less cores.
Now, for the story of how I got these results.
Adding RaycastCommand for Ground Heights
We do these things not because they are easy, but because we thought they were going to be easy
I quickly got the FOV mapping project working with Salvage Wars, but the long bake times really slowed down map design. I also noticed behavior on cliffs wasn’t as I expected (more on that later). When I looked into the algorithm, I realized that while the runtime calculation was super fast with GPU parallelism, the baking code was only using one thread.
I figured Unity’s batched raycasting API with RaycastCommand would be a quick fix for the millions of raycasts we were doing, especially since each cell is calculated independently. I definitely underestimated the amount of refactoring required and complicated debugging involved. Finding good resources online with other usage of RaycastCommand was hard, so I decided to record my learnings for the future. (Thanks Marnel Estrada for this excellent blog post.) While it didn’t turn out to be easy, I’m happy with the performance improvement in the end.
After analyzing the bake algorithm and writing the above summary to understand it, it was time to begin the conversion. Fundamentally, the single-threaded code was one giant nested for loop putting each of the steps in order and all state variables were just tracked as single loop-scoped variables. The main refactoring would be to rearrange the code to process multiple cells in parallel, which would require upgrading state variables from single loop-scoped variables into arrays of variables, or often NativeArrays which can be passed to/from the Job system.
The first stage was the easiest to convert, which was finding the ground height for each cell center. I created a small struct for the per-cell GroundHeightData and created a large array of that to cover the entire map. NativeArrays can only be one dimensional, so I also created just a 1D C# managed array for the ground heights to start getting used to converting to and from 1D and 2D indices. Then we just have a for loop over the batches, with an inner for loop to populate the buffer. I took care to only allocate the NativeArray command and result buffers once before the loop.
for (int i = 0; i < currentBatchSize; ++i)
{
    int globalIndex = startIndex + i;
    int squareZ = globalIndex / generationInfo.FOVMapWidth;
    int squareX = globalIndex % generationInfo.FOVMapWidth;

    // Position above the sampling point
    Vector3 rayOriginPosition =
        generationInfo.plane.position +
        ((squareZ + 0.5f) / generationInfo.FOVMapHeight) * planeSizeZ * generationInfo.plane.forward +
        ((squareX + 0.5f) / generationInfo.FOVMapWidth) * planeSizeX * generationInfo.plane.right;
    rayOriginPosition.y = MAX_HEIGHT;

    commandBuffer[i] = new RaycastCommand
    {
        from = rayOriginPosition,
        direction = Vector3.down,
        distance = 2 * MAX_HEIGHT,
        queryParameters = new QueryParameters
        {
            layerMask = generationInfo.levelLayer,
            hitTriggers = QueryTriggerInteraction.Ignore
        }
    };
}
One quirk of Unity’s RaycastCommand is that there is no graceful way to only process part of a buffer. It doesn’t have a count command, and only accepts a NativeArray, and not a NativeSlice. So for the final batch when the array is only partially filled, rather than resizing the array, I fill the end positions with default new RaycastCommand() structs, which with a zero distance are hopefully close to a noop, and we don’t read those results.
//Fill extras with empty commands
if (currentBatchSize < commandBuffer.Length) {
    for (int i = currentBatchSize; i < commandBuffer.Length; ++i) {
        commandBuffer[i] = new RaycastCommand();
    }
}

// Execute batch
JobHandle handle = RaycastCommand.ScheduleBatch(
commandBuffer, resultBuffer, 1, 1);
handle.Complete(); // Block main thread to await completion
The final step is just to read the resultBuffer and populate the groundData[] array based on the hit results.
Adding just this to this step only brought a small, low single-digit percentage reduction in runtime because it turns out one raycast per-cell pales in comparison to thousands of raycasts per cell that the rest of the algorithm does. However, it laid the groundwork for how to use RaycastCommand.ScheduleBatch().
Expanding RaycastCommand to Obstacle Detection
After we have the ground positions, which is really the only per-cell calculation, then we move into the per-direction calculations. This direction calculation is a bit more complex to parallelize, since each direction has a variable number of raycasts. There is an early exit optimization for vertical walls, plus depending on if we hit an obstacle or not, we may proceed into a binary search to find the top of the obstacle. This method is effective for identifying the top of a hill on terrain without seeing beyond it. However, converting this to batched raycasting presents a challenge because the subsequent raycast in a given direction is contingent on the outcome of the previous one.
The solution is similar to the previous step where we just take all the loop local variables and place them into arrays, but since there are so many more directions than there are cells, I didn’t want to pre-allocate every direction the way I did for every cell’s ground position. So instead, I created a list of “active” directions state in an array of structs to keep the memory requirements bounded.
The Wavefront Algorithm
I was initially also held up with the concept that unlike with the ground raycasts, I didn’t know how many total raycasts I needed to perform, and I was limited in max concurrency. I adopted an approach I called “Wavefront”, where we will iterate in “waves”, where each wave we process a batch of raycasts, until all raycasts are completed. We don’t need to know the number of waves / batches up front because at the beginning of each wave, we will re-allocate cells and directions into wave slots.
The four steps of this Wavefront direction processing are to continuously loop while there remains work to be done:
- TopUp: Populate the wave with active directions aka “Active Set” with new unprocessed directions
- Gather: Process the active directions to generate the raycast commands into the command buffer
- Raycast: Execute the raycast commands
- Consume: Retrieve raycast results and update the state accordingly, marking now completed directions to be replaced next
TopUp.
Build the Active Set: TopUp
The Active Set is the set of all directions with work remaining to be done. Despite being named a set in this post, it is not implemented as a set for performance reasons. Instead, I implemented this as a List<> to hold the direction state objects, and a stack with free indices. This way we can quickly add and remove elements anywhere in the set by simply marking which indices are “open”. Conceptually, it is a set with a fixed number of slots.
var activeDirList             = new List<ActiveDir>(activeDirCap);
var activeDirFreeSlotIndicies = new Stack<int>(activeDirCap);
To pick items to fill the active set, I wanted to use the concept of a work queue, however it would be too memory intensive to create a literal queue of all directions, so I instead created a queue of cell cursors, which track remaining progress of a cell. It turns out after optimizing this cursor it was just a single state variable with what direction index to process next. In the future I may have used enumerator + yield to lazily generate this list, but allocating memory one per cell like with ground heights was fine here.
The final TopUp process simply combines these two items. While there are open slots in the active set, pop a cell cursor off the queue, and initialize new ActiveDir state structs to track progress in that direction.
If we ran out of room to fully process a cell, push it back onto the queue for the next round.
Implementation Complications
After generating the active set, the remainder of the three steps to generate a raycast command into the buffer, generate the results, and read back the results were conceptually simple. I sized the active set to be larger than the buffer, in case some directions didn’t generate a raycast that wave. This required an extra mapback array in addition to the results buffer to tell the result readers what direction the raycast result belonged to. This would turn out to be unnecessary trouble.
Furthermore, this migration moving from inline to using the ActiveDir state proved more complex than anticipated. Initial tests yielded FOV bakes that significantly deviated from the original. I didn’t have a quick way to test this besides starting the game, and I didn’t have a good way to compare to previous versions without switching branches in git. I decided to take a detour to enhance my tooling and dev workflow. First, I modified the FOVGenerator class with the strategy pattern to allow both the older single-threaded algorithm and the WIP batched algorithm to co-exist in the code base, with a new enum for algorithm type on the bake settings. I then developed an editor window for comparison between baked maps, allowing me to run and compare two different FOV bakes, as well as compare their timings. This tool clearly demonstrated the inaccuracy of my initial attempt at the batching algorithm. My goal was a 100% match to the original results, excluding floating-point discrepancies. I also updated my other editors (for the FOVManager and FOVBakeSettings ScriptableObject) to display a preview of the baked Texture2dArray to visually see the differences too. I also refined the asset saving process to avoid refreshing the entire asset database each time, which was adding an extra 5-10s delay with each bake.
With a faster method for identifying discrepancies, I successfully aligned the new wavefront algorithm to produce identical results when processing batches. However, while the algorithm was faster on small sizes like 64x64, it was slower on large sizes like 256x256. At this point, I turned to the profiler. To make it easier to read profiler results, I manually instrumented my code using the ProfilerMarker API to track each of the four outlined stages above. This was straightforward to implement with marker.begin() and .end() calls, and I discovered an even newer way with C# using syntax that also properly handles exceptions:
using (marker.Auto()) {
  /* timed code */
}
Initial Performance Gains
After instrumenting the code to time the four steps outlined above, I realized the root cause of the speed decrease was an inefficient Gather step, which iterated over the entire remaining work queue filling open slots without an early exit. I rewrote this to take a more traditional queue popping approach with early exit. After fixing this obvious error, the new bake algorithm performed approximately twice as fast in all cases, small or large. This was a good result, but not as much as I had hoped for on an 8-core CPU.

Further reviewing the performance, I realized the code was spending almost all of its time in the Gather and Consume steps, with only a minority of the time in the Raycast step. I suspected this was due to newly added overhead, so I tuned the batch size and avoided unneeded memory allocations, but while increasing the batch size offered a slight improvement, it didn’t fundamentally alter the number of operations required. Turning on “Deep Profiling” revealed that trigonometric functions consumed a significant portion of the processing time. Consequently, I realized this wasn’t just overhead, but true work was being done, and decided to move to the next optimization stage: the job system and burst compilation.
Full Jobification
To expand the parallelization beyond just raycasting, I need to parallelize the steps for creation of RaycastCommands (Gather) as well as the read of the results (Consume). The biggest challenges here are identifying data dependencies and synchronization boundaries between the worker threads and the main thread. When do workers need to coordinate with other workers, and when can they just focus on exclusively their own data? Fundamentally, each direction is an independent calculation, so it should be possible to fully parallelize the logic.
Unity Jobs 101
IJobParallelFor (Unity Scripting Reference)
“Parallel-for jobs allow you to perform the same independent operation for each element of a native container or for a fixed number of iterations.”
The complicated part about Jobs is you have very strict requirements on communication between the main thread and the worker threads. Within IJobParallelFor, the primary method is to define a number of NativeArray objects that will only ever be accessed at the index provided in the execute(int i) callback. This can be used to both read and write single elements of data. You can have many different NativeArrays, as long as their indices are all aligned. Furthermore, tagging the NativeArrays as [ReadOnly] helps with both speed and correctness.
There’s also a feature called a ParallelWriter, which allows threads to append to a list or Queue in a thread-safe way. The underlying collection can’t be resized, and the write order is indeterministic, but multiple worker threads can all push to the same queue.
Another perk of jobs is that in addition to being scheduled on worker threads in parallel, each individual job is more efficient when you add the [BurstCompile] tag. This compilation isn’t magic, since it restricts the set of supported operations from full C#, but since we are already under constraints and a forced rewrite from parallelization, I didn’t have to specifically address any of these constraints.
Updating Wavefront Algorithm
IJobParallelFor was a great starting point to process each element in our active set independently of each wave. However, condensing from the full active set to the batch size buffer was a synchronization nightmare. We could use ParallelWriter to push to the command buffer, but simultaneously pushing to the mapback array was impossible to synchronize without an extra copy step afterward, defeating the point.
A critical realization was that this mapback array wasn’t needed at all if we just aligned the active set to the command buffer. Initially, the logic for processing a batch of active cells or directions was burdened by the uncertainty of how many raycasts a direction needed. If each direction could finish early, a partial batch would need to be processed, so I oversized the active set relative to the batch size to give it some headroom for some directions to complete early and still keep batch utilization high. However, with each wave, finished directions were evicted and replaced. Therefore, every element of the active set was guaranteed to generate a raycast in each wave, eliminating the need for two separate buffers. By aligning the two buffer sizes, we could eliminate conditional logic and render the mapback array unnecessary, enabling parallelization.
Another consequence of this simplification is that the initial TopUp step needs a fully updated state to evict finished directions. Furthermore, another parallelism-induced limitation was that any NativeArray that was written to had to be Complete()’d first before being read again. This forced me to move all state update code to the final ConsumeJob, which turned out to be a much cleaner design. After all, that is the part where we receive the results of the raycast and new information. Consolidating the state update code not only made parallelization possible, but the code was logically easier to follow. Now an “Active” direction always meant “I have another raycast to perform”, and “Done” meant “will be replaced next TopUp()”.
By moving the NativeArray<ActiveDir> update to the final ConsumeJob, I was able to schedule all three concurrently set as dependencies of each other, and only await completion via .Complete() on the final step. This again resulted in both cleaner code and a small performance boost because the first stage could be processed while the second and third stages were being assembled. The only single-threaded steps remaining are the TopUp of the active set, and applying the results of ConsumeJob to the managed arrays.
In the state updating consume job, we use parallel writer to push a list of direction indices that are in the done state, which we can use to efficiently update the buffers in the TopUp step and trigger the transfer of NativeArray data back into managed objects like our Color[][] array which can only be interacted with from the main thread.
One quirk of ConsumeJob was that we could not access the hit.collider component outside of the main thread, which we were using to detect if a collision has occurred. Instead, we check hit.distance to validate if there was a hit.
// Only works on Main Thread
bool hasHit = hit.collider != null
// Works inside job
bool hasHit = hit.distance > 0f && hit.distance < float.MaxValue;
The final 4 step job code looks like this:
TopUpPool();

// 1) Gather raycast commands (parallel)
JobHandle gatherJobHandle = new GatherJob {
    activeDirs = activeDirs,
    ground = groundNA,
    baseDirVec = baseDirNA,
    samplingAngle = g.samplingAngle,
    anglePerSample = anglePerSample,
    rayDistance = RAY_DISTANCE,
    levelLayer = g.levelLayer,
    cmdBuffer = cmdBuffer,
}.Schedule(activeDirs.Length, 64);

// 2) Physics
JobHandle raycastJobHandle = RaycastCommand.ScheduleBatch(cmdBuffer, hitResultBuffer, minCommandsPerJob: 8, gatherJobHandle);

// 3) Consume back into pool entries
finished.Clear();
JobHandle consumeJobHandle = new ConsumeJob {
    hits = hitResultBuffer,
    ground = groundNA,
    samplingAngleHalf = g.samplingAngle * 0.5f,
    anglePerSample = anglePerSample,
    samplingRange = g.samplingRange,
    blockedRayAngleThreshold = g.blockedRayAngleThreshold,
    blockingSurfaceAngleThreshold = g.blockingSurfaceAngleThreshold,
    samplesPerDirection = g.samplesPerDirection,
    binarySearchCount = g.binarySearchCount,
    pool = activeDirs,
    finished = finished.AsParallelWriter()
}.Schedule(activeDirs.Length, 64, raycastJobHandle);

consumeJobHandle.Complete();
Taking a look at the profiler after making these changes, we see much higher percentage of time spent with the worker threads active:

Remaining Single-Threaded Work
Two sections of the code remain outside the job system. The first is the TopUp step, which fills buffers from the work queue. To parallelize, this would require multiple threads popping from the same queue simultaneously which is too much synchronization and not directly supported by the jobs containers. Even initializing the state would take a contiguous array of freshly popped directions and write into non-continuous slots of the active set. Using parallel writers with different indices is less ideal, and although the algorithm avoids write conflicts, this needs to be formally proven for burst compiler safety checks (Or use the new [NativeDisableParallelForRestrictionAttribute] attribute). Overall, this task is a low priority for further optimization.
The second outstanding step, writing back into the color array, is clearer in how it could be updated for parallelization. A potential approach involves writing directly from the job system to a native array and then, in a final step, copying from the native array back to the managed array. This contrasts with the current incremental approach each wave. However, it’s unclear if this would provide significant gains, since the reads/writes are not contiguous anyway.
New Bake Algorithm: Distance Based Search
After spending far more time than I anticipated optimizing the bake process, I could return to my original goal of experimenting with the bake algorithm game logic itself. Surprisingly, after streamlining the algorithm, the code became simpler, not more complex, contrary to my initial fears and common optimization challenges. With a clear consolidation of direction, state, and logic, I could now focus on further refinements.
Salvage War’s current test map uses Unity terrain and has high valley walls surrounding all edges to prevent units leaving the map bounds. One of my hopes for the detailed FOVMapping approach was to handle Starcraft-style cliffs naturally, where units at the bottom of a cliff don’t have visibility onto units on top of the cliff. However, while this worked when units were directly next to the cliff, they often had visibility above the cliff if they backed away somewhat. After investigating the vertical angle-based binary search, I realized the algorithm was working correctly … to find the top of the valley walls.
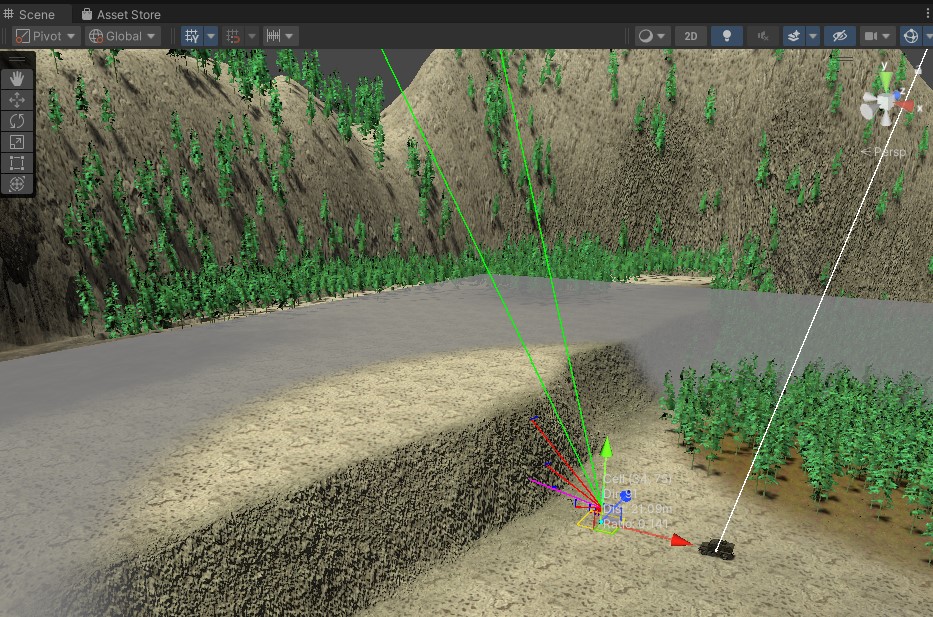

I realized in my head I was imagining the algorithm optimizing for the max distance directly, not the angle, so I tried that out. I updated the algorithm to use a distance-based binary search. The main complexity was the need to alternate ground position finding raycasts with obstacle finding raycasts, which was easily managed by extending the active direction’s state struct. All my previous work paid off, since this change was made much faster and was more easily tested. Overall, I am satisfied with the distance-based raycasts, and they prevent units in both directions from looking over the cliff edge, while completely avoiding accidentally looking at the valley walls. For most use cases in my game, I believe this distance-based algorithm will be preferable.
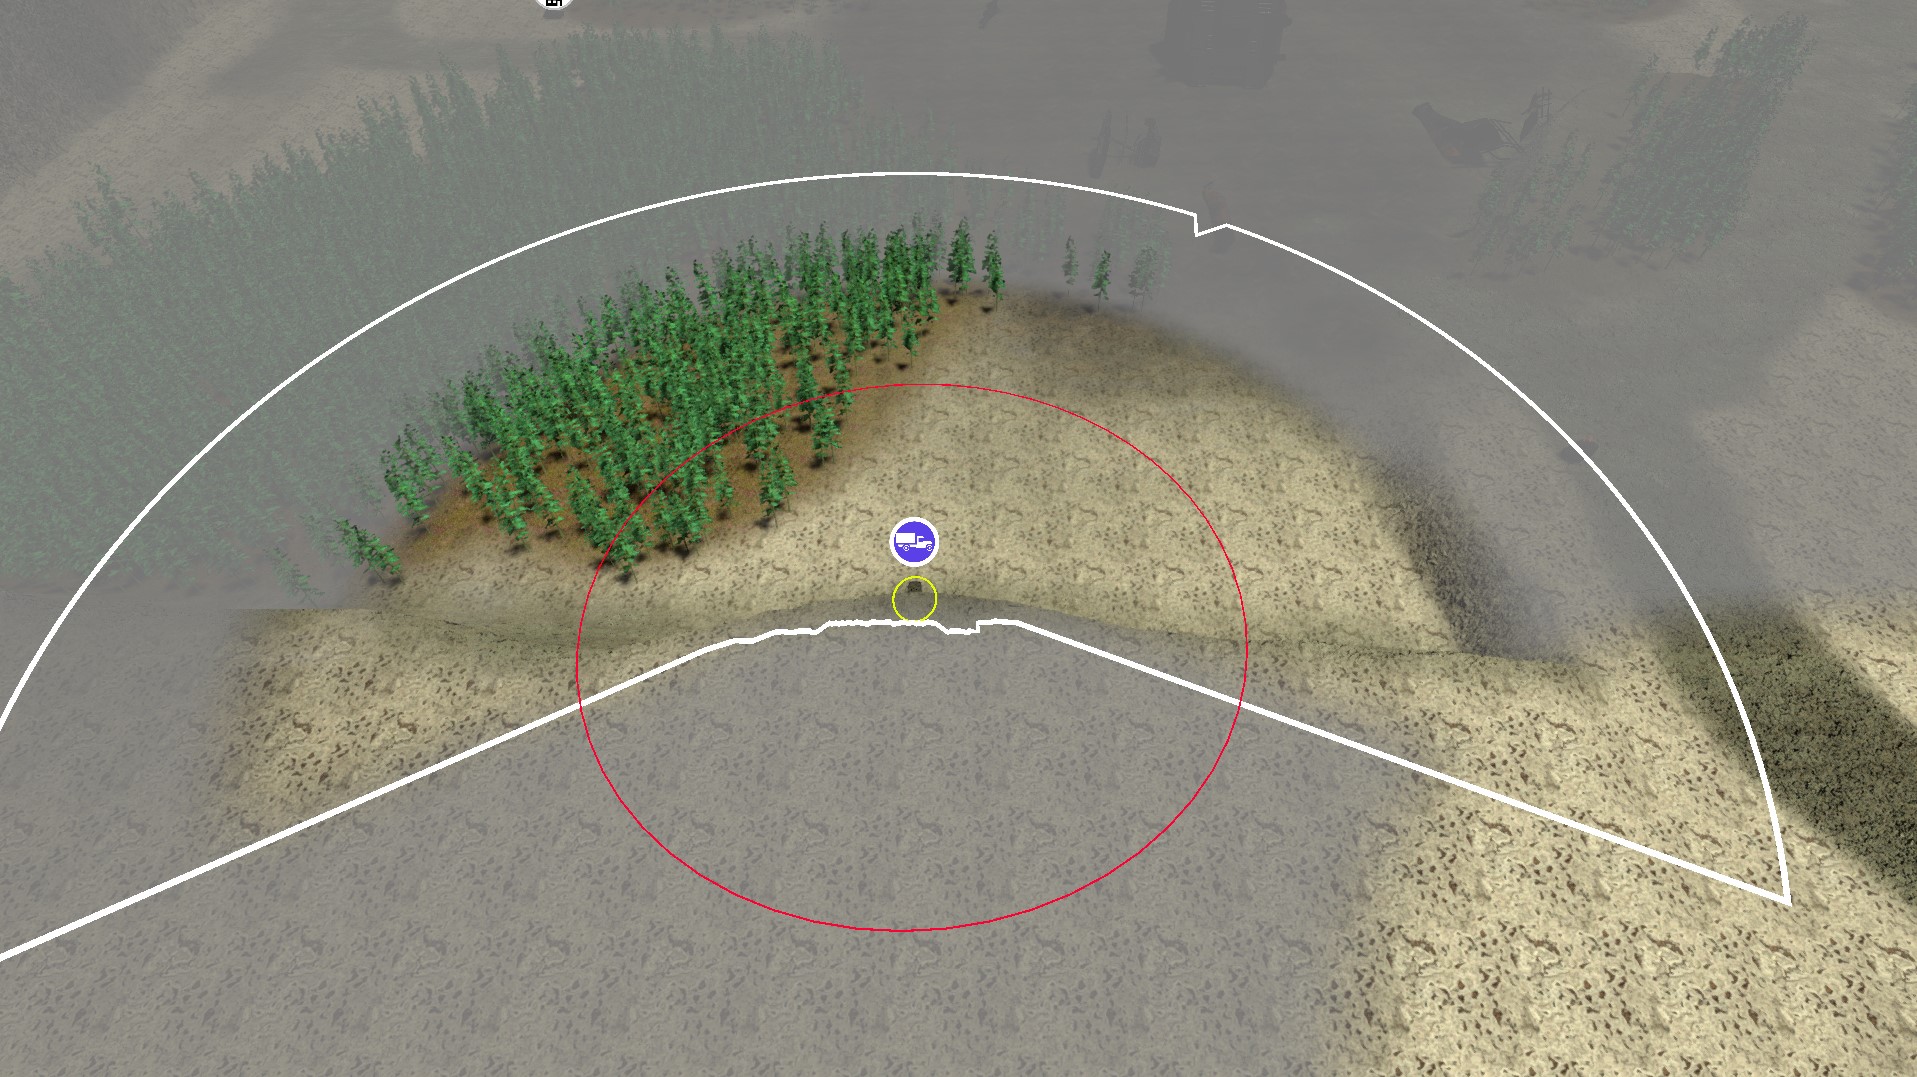
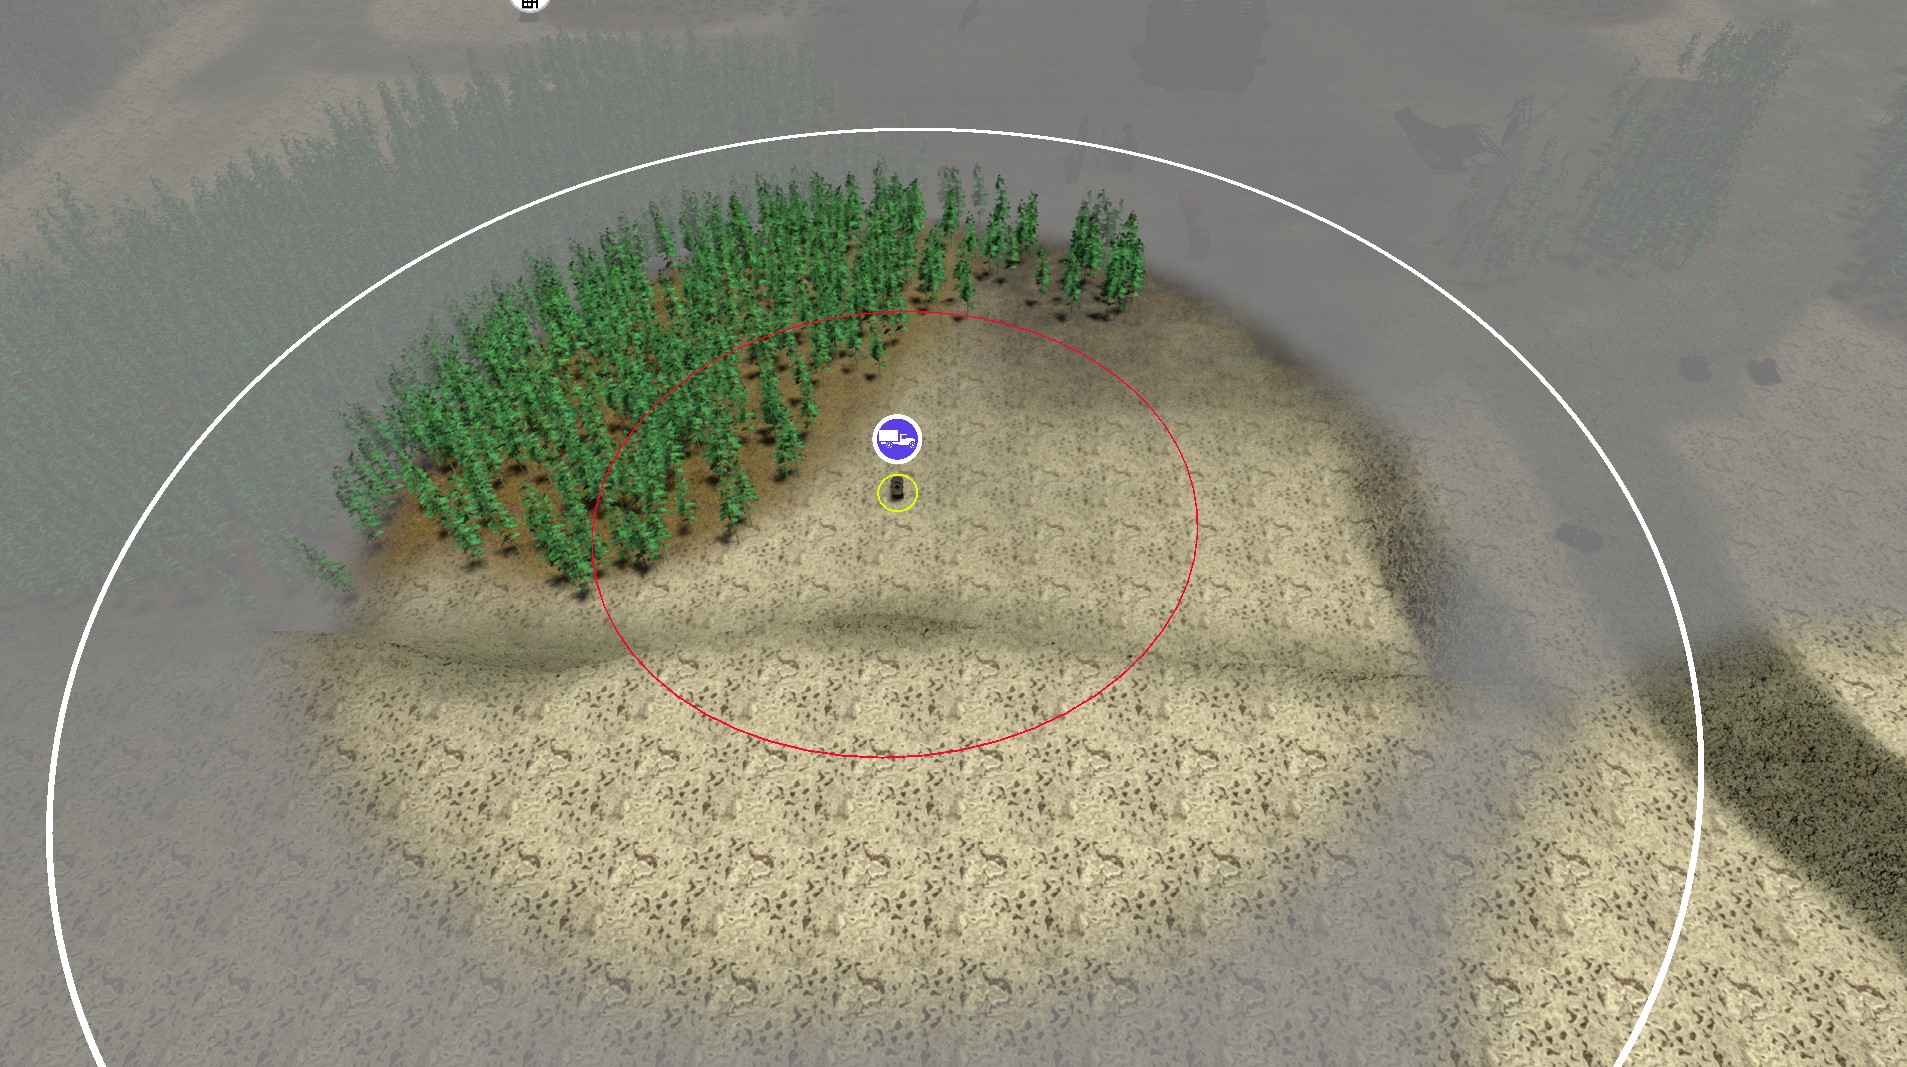
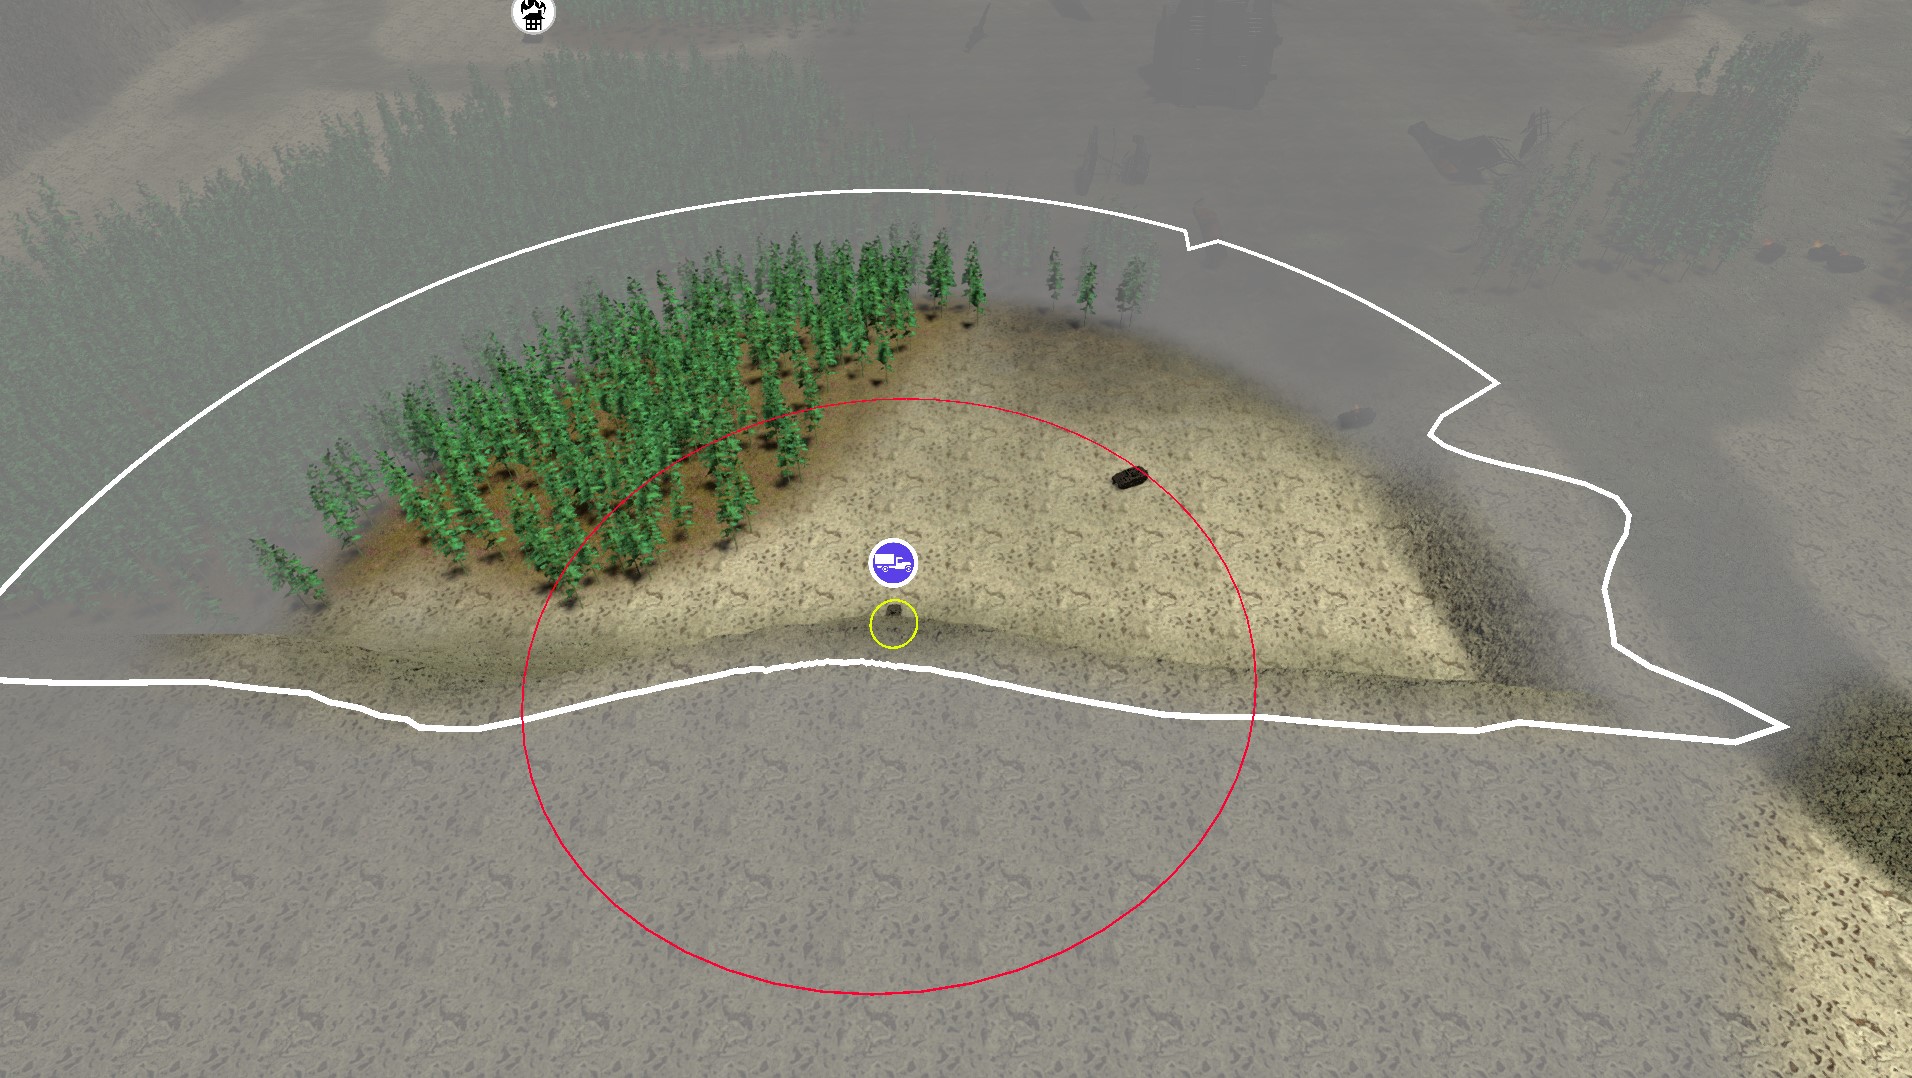
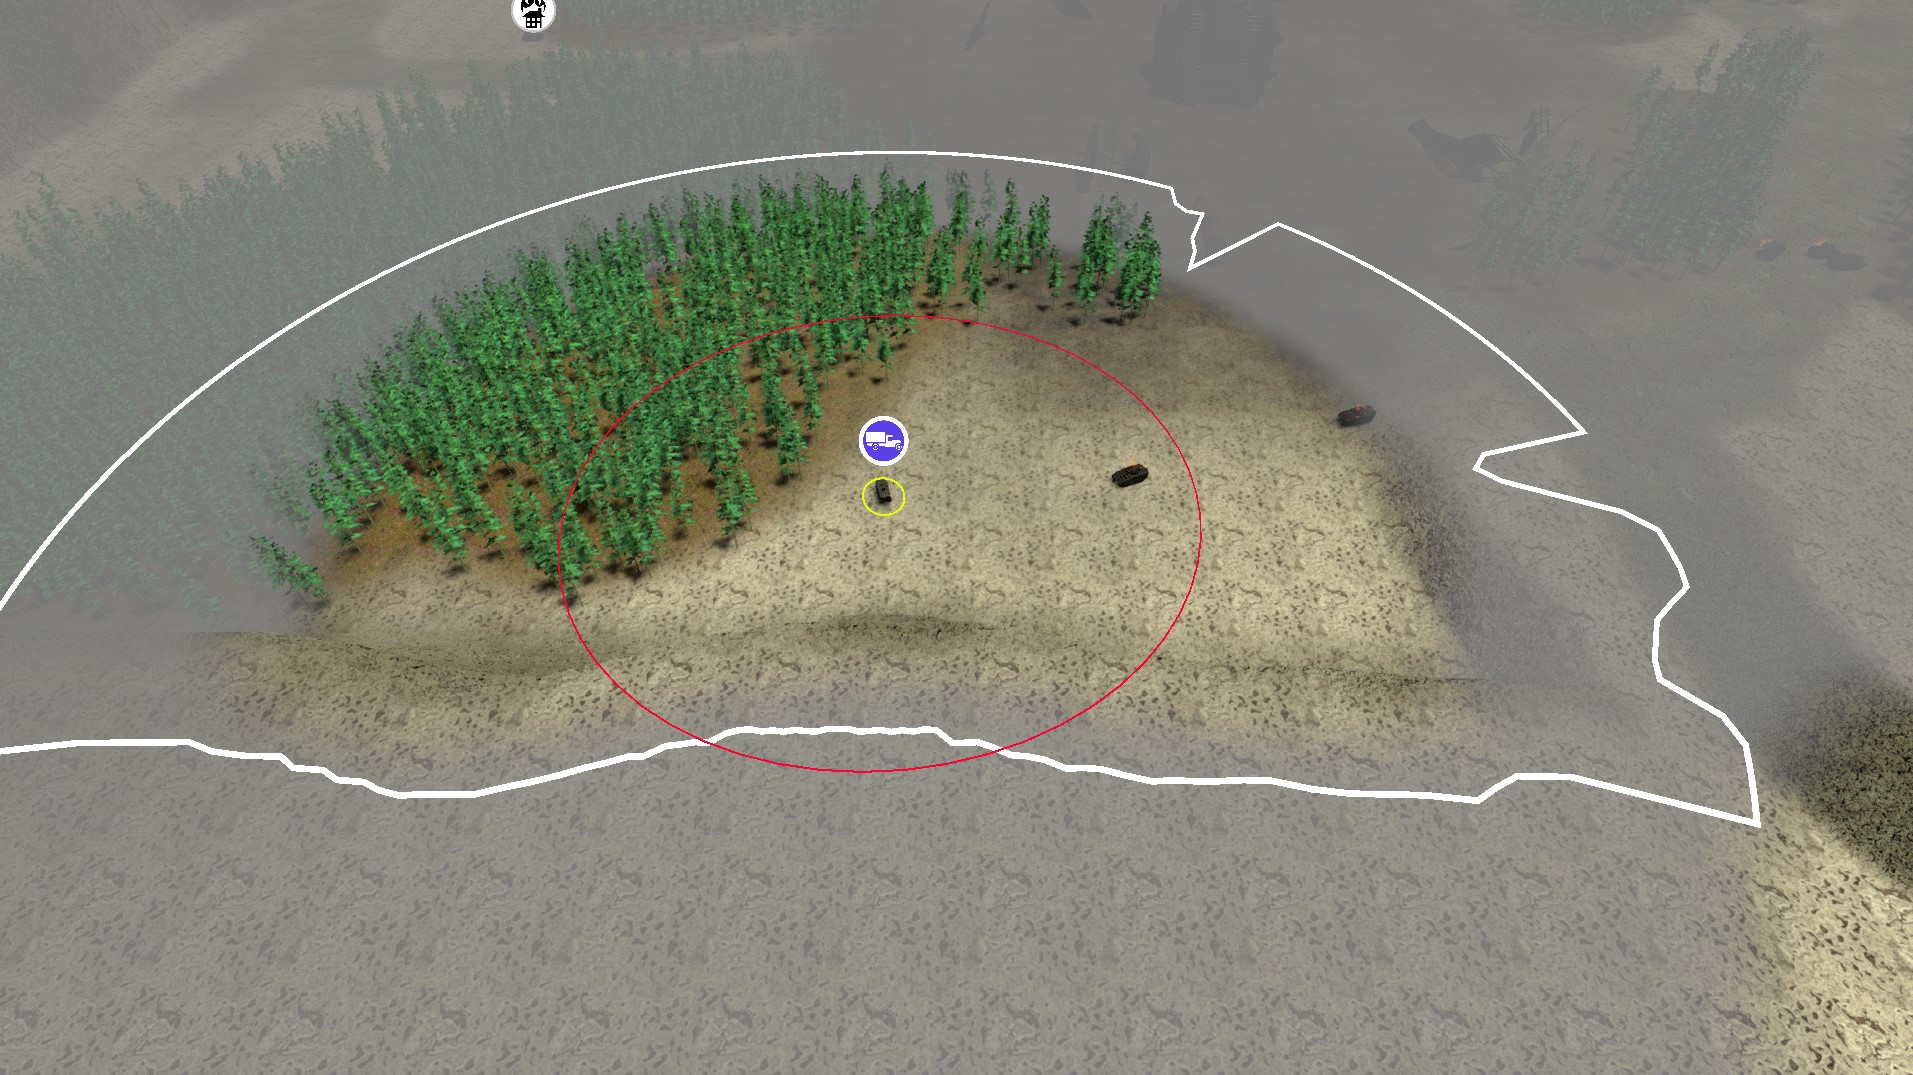
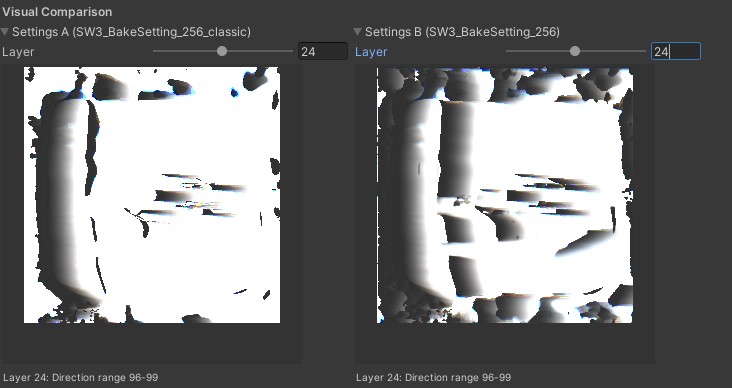
You can see the difference in the baked maps too. The screenshotted location was in the top left quadrant. The new distance-based algorithm (right) has a smooth gradient extending away from the cliff, where the classic algorithm has a hard cutoff between black and white.
Some other updates I added to this package were allowing agents an additional omnidirectional vision radius, so infantry can see behind them slightly, as well as improving the workflow by storing bake settings inside ScriptableObjects, and updating the editor windows to support this.
I’ve submitted a GitHub Pull Request back to StupaSoft to include these updates back into the core FOVMapping project. While they are under review, you can check out the code for my forked changes here: https://github.com/DriftCascade/FOVMapping
Future Improvements & Remaining Limitations
This distance-based algorithm generating a lot more ground raycasts highlights further algorithm refinements and optimizations. The current algorithm assumes all obstacles are valid ground positions, which could lead to a cell appearing on top of a wall instead of beside it, resulting in a major artifact if that isn’t intended to be walkable. Separating the layer masks for ground versus obstacle detection would prevent this issue, a relatively simple change. Taking this a step further, if the ground collision mask is exclusively the terrain, the physics raycasting system can be bypassed entirely. Instead, ground positions can be found quickly by directly referencing height map data, and even ground-to-ground only raycasts could be accelerated this way by path tracing on the heightmap data directly.
Finally, I realized a fundamental limitation of this field-of-view map approach is that it can only store one “closest” obstacle at a time. It is not a full shadow-casting implementation, or a “viewshed” as GIS professionals call it. A complete algorithm would cast light (or shadow) onto the ground, showing in detail what is visible and where. To bake this result in a similar format would require adding another dimension; currently, each cell stores a direction and a single value for the nearest obstacle. Instead, it should store a boolean array along distances, indicating visibility at that range from that cell.
Pre-calculating this level of detail would consume too much memory and processing time. The primary loss in not having this full calculation is the ability for units to hide in a ditch. For example, a unit can hide behind a wall of the same height, which would block all visibility behind it up to the maximum calculation range. However, if units are in a trench or ditch, the viewer can still see behind the closest obstacle. The ditch won’t register as an obstacle, so units in it will appear invisible but might not be completely un-castable. The cartoon below represents the challenge.

Cartoon Credit: Andrew Tyrrell
The house labeled “can’t be seen” above would be rendered as visible by the FOVMap algorithm, assuming the binary search algorithm finds the rightmost hill as the max obstacle. It might be possible to partially reconstruct this on-render by taking advantage of the fact that the red house’s FOVMap would show the inverse direction has a very short obstacle in front of it (the middle hill), however that is an exploration for another day.
Ultimately, any game’s fog of war system is an abstraction of reality. In its current state, I think it’s good enough for Salvage War’s use case. Units in Salvage War have their own spotting and detection systems that are separate from the FOVMap, which is really just for player information. I’m still deciding how best to utilize and represent the nuance between “Possibly Visible” (FOV Map) vs “Spotted” (spotter raycast beat stealth check) vs “Targetable” (radar lock, weapons aimed with clear line of fire).
TL;DR: Key Insights
- Partial
RaycastCommand.ScheduleBatchexecution: SinceRaycastCommandcan’t useNativeSliceand doesn’t accept a count parameter, fill empty buffer space with default RaycastCommand structs as padding instead of resizing every batch. - Use
IJobParallelForalong withRaycastCommand: In pretty much every case you useRaycastCommand, you’ll be populating the command buffer and reading from the result buffer. This naturally pairs well withIJobParallelForto also parallelize the pre/post processing of raycast results. In my case, the trig functions were an even bigger consumer of CPU than the raycasts themselves. I also further cached/precomputed angles that would be accessed each iteration, and usedUnity.Mathematics’ Burst-friendly math inside the jobs for even bigger gains. - Array-of-Struct State + Wavefront Strategy: Collecting all loop-local variables into a struct, then creating an array of them for batch operations to process in “waves” is an effective way to convert single-threaded loops into job-safe systems. Each wave refills completed slots, gathers, raycasts, and consumes results — keeping memory bounded and parallelization simple.
- Profiling & Debug Tools: Profiling is essential for any optimization project, and this was no exception. Investing in custom debug windows, a bake comparison UI, and a ScriptableObject-based workflow paid off with faster iteration and clearer debugging in my case.
- Parallelization Simplified the Code: Properly jobified code forced cleaner data flow — explicit dependencies, centralized state updates, and aligned buffers — resulting in faster and easier-to-reason-about logic.
- New Distance-Based Bake Algorithm: Switching to distance-based search improved cliff visibility and integrates cleanly into the parallelized pipeline, showing the value of an extensible, data-driven architecture.
I’ve submitted a GitHub Pull Request back to StupaSoft to include these updates back into the core FOVMapping project. While they are under review, you can check out the code for my forked changes here: https://github.com/DriftCascade/FOVMapping
Acknowledgements & Resources
- Marnel Estrada wrote a great blog post on How to use RaycastCommand.
- Thanks again to StupaSoft for the excellent FOVMapping library.